Cream Cheese Flowered Bread


If not mistaken, this recipe was baked in 2009 that was long long time ago. I miss the flower shape which I learned from 孟老师的100道面包. I named this recipe as Twisted cheese bread on my previous post.


This time I use my most fuss free dough recipe 65度汤种面包 but still follow the flower shaping of 孟老师. Beside the ugly shaping, the bread texture is cottony soft and fluffy. The cream cheese fillings has light sweetness that goes so well with the fluffy texture.


For the dough:


210g bread flour / 56g plain flour / 20g milk powder / 42g caster sugar / half teaspoon of salt / 6g yeast / 30g beaten eggs / 85g water / 84g water dough / 22g unsalted butter


For the cream cheese fillings:


150g cream cheese / 2 tablespoon caster sugar / 1/2 tsp lemon juice / 10g biscuit crumbs / 10g almond flakes


Recipe for the water dough "water roux": Cook 125g water with 25g bread flour at medium low heat, keep stirring until it become thicken and no lumps left like a smooth baby porridge. Transfer to a clean bowl and cover with a cling wrap to avoid skin forming.


Put all the dough ingredients for kneading until smooth and elastic and the dough no more sticking at the side of the mixing bowl. Let it proof for 40 minutes in a clean bowl cover with cling wrap.


While waiting for the dough, mix all theq cream cheese fillings until it become a smooth paste.


Divide the dough into 2 portions and round them into small balls. Let them rest for 10 minutes.


Flatten the dough to a round disc and spread the filling at the center. Roll the doughs into round shape.


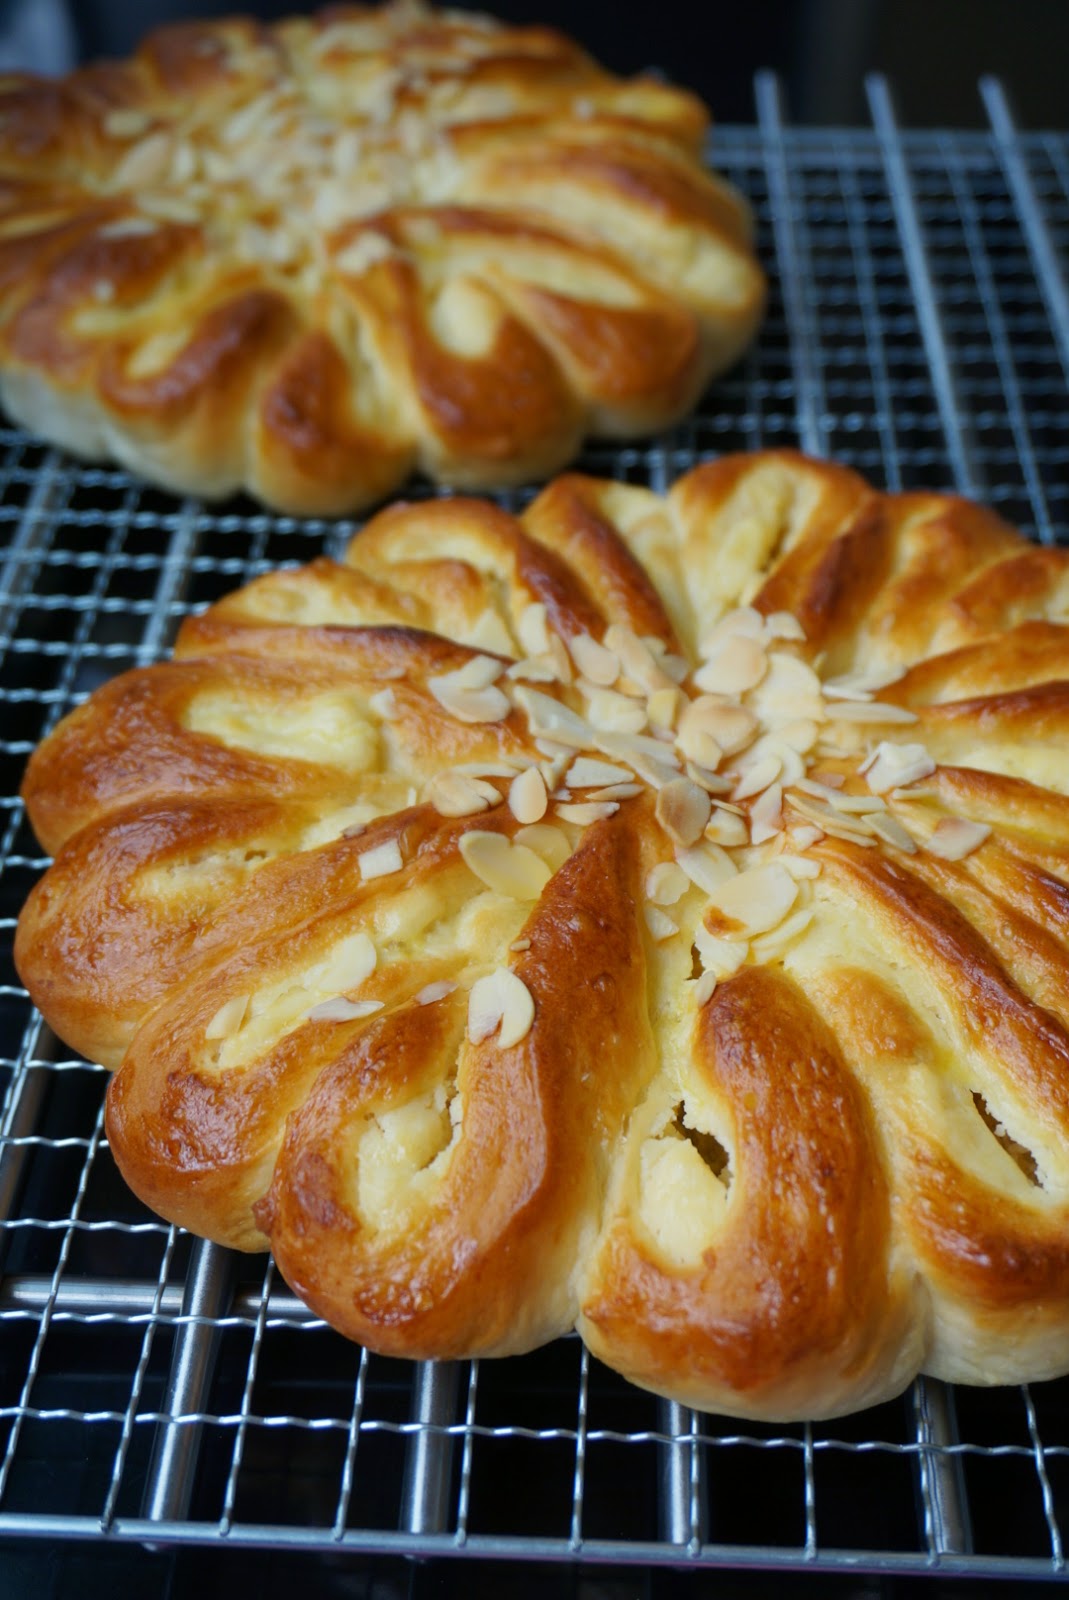
Use a rolling pin and gentle roll the dough out to a flat disc. Use a scissor to cut 2 inches at the edges for 12 petals. Twist in two petals face to face and you will get six pairs of petals. Let it proof for 40 minutes.


Egg wash the doughs and sprinkle over the almond flakes on the center of the flower shape doughs. Bake at 180'C preheated oven for 15 minutes until golden brown.

Cotton Cheesecake


Looking through the list of my baking history, e wasn't any Japanese cotton cheesecake in the list. I forgot whether I baked but didn't post it up or I've never did it before. Reading some of the bloggers cotton cheesecake really tempting me to make one and jot it down to my baking memory land.  


So I tried a recipe introduced by Happy Home Baking


I am very satisfied with this recipe as it's quite  simple like chiffon recipe and required less cream cheese.  Most importantly it will not sink or shrink much and hold it shape nicely after out from the oven until cool down. It is very light, cottony soft and giving a bit bouncy texture that I believe could win over most of the people who don't like dense and rich cheesecake. It's like eating without adding any calories to your body, which is not true! But it's definately a lot lighter than a new york cheesecake.  But sadly for this cheesecake not suitable for refrigerate as it lose its texture  to harden if keeping in the fridge. That mean I can't have cold cheesecake. May be I need to try out another recipe.


Overall, I am satisfy with this new attempt and sure this cake will be one of the good present to be given away.


Recipe for 8 inches round cake pan


cream cheese 125g


unsalted butter 68g


caster sugar 50g


egg yolks 5 pcs


fresh milk 138g


lemon juice 7ml


plain flour 83g


corn flour 41g


egg whites 5 pcs


caster sugar 80g


lemon juice 5ml


  1. Double boil the cream cheese,  butter and sugar until everything come to a smooth consistency. 

  2. Add egg yolk one at a time and keep stirring until well combine.

  3. Mix in the milk and lemon juice follow by the shifted flour and corn flour until no any lumps left.

  4. In another bowl, add the egg white with lemon juice and beat until frothy. Add in the sugar in three batches beat on medium speed until soft peak foam. 

  5. Fold the egg white mixture into cream cheese mixture in fee batches until everything well combine. 

  6. Pour into a greased and lined baking parchment  of baking tin. Steam bake for 50 to 60 minutes. I place a tray of water at the lowest rack of the oven and place another rack on the second lower rack for the cake. 

  7. After bake, let it cool at room temperature and serve. It is not suitable to refrigerate from my first attempt of this recipe.


Blueberry Bakewell Tart


After discovered by another good recipe of shortcrust pastry which is from 孟老师,  I think I would stick on it for all my pastry making  from now. Previously I was using chef Lesley Water's recipe which contains no egg whites in the pastry but only egg yolk that produce a very crumbly but absolutely fragrant texture.


For the 孟老师 recipe which consist of egg white and yolk that produce harden and stable base which can be hold all kind of sweet or savoury fillings. For this new recipe I don't have to worry about it will fall apart when doing the cutting as it is not fragile  as crumbly texture. Seems like the egg white do a good job in the pastry.


Ingredients for a pastry fit 28 cm tart pan


330g plain flour

70g sugar powder

1/2 teaspoon salt

70g whole beaten eggs

160g cold butter (cut into small chunk)


For the almond fillings


250g butter

130g caster sugar

3 large eggs

1 teaspoon vanilla extract

285g ground almond

50g plain flour

some blackcurrant jam

some fresh blueberries


For the pastry, mix the flour, sugar powder and salt in a food processor until combine.  Add the butter and pulse the food processor in few times until everything become fine bread crumbs. Add in the beaten egg and pulse again for few times until it almost come to a dough. Take out the dough and flatten it to become a round disc. Cling wrap it and chill in the fridge at least 1 hour before use.


For the almond fillings, mix the butter and sugar in a food processor until well blended. Add in eggs one at a time and pulse again until well blended then mix in the vanilla extract.

Add the flour and the ground almond and pulse the food processor until everything combine and become a thick paste.


Line the chilled pastry onto a tart pan. Spread some jam on the tart base then layer all the almond fillings onto the pastry. Arrange some blueberries on the top and chill for an hour before bake.


Bake the tart in an 180C preheated oven for about an hour. After bake, let it completely cool down on a wire rack before serving.


Lemon Curd Hokkaido Cupcakes


The pass two month I was so crazy making lemon curd after falling in love with some tangy and refreshing cakes. After making the lemon curd sponge cake, I was continue making another lemon curd Swiss roll then coming up with lemon curd chiffon cake and then lemon curd hokkaido cupcakes. What 's next? I think I should give it a break, so I come here to jot down my works., lemon curd hokkaido cupcakes.  Nothing complicated as I just using the same hokkaido cupcakes recipe as I normally stick on and the same lemon curd recipe I used in the previous Lemon Gateau. The hokkaido cupcakes is filled with lemon curd and whipped cream that make the cakes really refreshing.  


For the Hokkaido cupcakes


Ingredients


45g egg yolks


20g caster sugar


35g vegetable oil


45g full cream milk


60g plain flour


135g egg whites


40g caster sugar


200g whipping cream


Some lemon curd


For the Lemon Curd


4 large eggs


120g caster sugar


130g lemon juice 


2-3 lemon zest


90g Butter


Combine the eggs, sugar, lemon juice and zest and cook over a double boiler until smooth and thicken.  Add butter and stir for the final shining and silky consistency. Set aside to cool while preparing for the hokkaido cupcake.


Whisk the egg yolks with caster sugar until pale in color then add the oil follow by the milk. Shift in the plain flour and mix until no any lumps left.In another clean bowl, whisk the egg white until frothy then add the caster sugar in three batches and keep whisking until nearly to a stiff peak foam. 


Fold in the egg white mixture to the egg yolk mixture in three batches until well mix.Divide the mixture into each hokkaido cups about 80 to 90 percent full and bake in 100C preheated oven. Bake at 100C for 10 minutes follow by 120C for 20 minutes then 140C for 15 minutes and lastly 150C for 10 minutes. Bring out the cupcakes from the oven to cool down while preparing the cream.


Whisk the whipping cream with a tablespoon caster sugar until stiff peak. Once the cupcakes completly cool down, pipe some lemon curd into the cupcakes then follow by the whipoed cream. Chill in the fridge and it is best serve cold.


Mexican Bun


I still prefer my comfort recipe of 65C 度汤种面包 all this while or may be I am too lazy to try out others good recipe out there.  I was using another dough recipe on my coffee bun which is also same as Mexican bun but actually I found this water roux dough recipe is much suitable to go along with the buttery fillings and toppings. The dough hold its shape nicely and the soft texture is a winner.

The toppings turns sticky on the next day so I toast it in the oven at 190 C preheated oven for 6 minutes and it turn back to its crispness.


Recipe for the water dough "water roux": Cook 125g water with 25g bread flour at medium low heat, keep stirring until it become thicken and no lumps left. If you've a candy thermometer, measure it until the temperature turn to 65C then turn of the heat. I didn't measure it with thermometer, so I cook it until like a baby porridge. Transfer to a clean bowl and cover with a cling wrap to avoid skin forming.


Recipe for the 8 buns:

210g bread flour / 56g plain flour / 20g milk powder / 42g caster sugar / half teaspoon of salt / 6g yeast / 30g beaten eggs / 85g water / 84g water dough / 22g unsalted butter


For the filling:

100g butter (softened)

1/4 teaspoon vanilla extract

35g brown sugar


For the topping:

50g butter

40g icing sugar

38g beaten eggs

1 teaspoon granulated coffee dissolve with 1 teaspoon water

pinch of cinnamon powder (optional)

50 plain flour


Put all the buns ingredients for kneading until smooth and elastic and the dough no more sticking at the side of the mixing bowl. Let it proof for 40 minutes in a clean bowl cover with cling wrap.


For the filling, using an electric mixer beat the butter and brown sugar until light and pale until the sugar totally dissolved. Add in the vanilla extract for the final beating. Place the mixture into the fridge until it harden. Divide the harden mixture into 8 portions and sit in the fridge until ready to use.


For the toppings, beat the softened butter with icing sugar until everything well combine. Gradually add in beaten eggs then the coffee mixture. Add in pinch of cinnamon powder with the flour and beat until everything well incorporate. Place the mixture into a piping bag and keep in the fridge until ready to use.


Divide the dough into even size of 8 portions and shape it into smooth ball shape. Let is rest for 10 minutes.


Flatten each dough with your hand and wrap the filling into the dough. Seal it tightly. Let it proof for 40 minutes cover with cling wrap to avoid dryness.  


Pipe out the coffee toppings on each buns and bake at preheated oven for 15 minutes. 


Vanilla Ice Cream


I always make this homemade vanilla ice cream available in my freezer for it is so important to serve with some dessert that we have it at home most of the time. For example lava cake, fruit crumble, soufflé, waffle, pancakes, chocolate fondue, banana boat dessert, ice blended drinks, brownies.... you name it! Not only that, having just a good scoop of this vanilla ice cream alone is so wonderful!


I had a five stars lava cake in the restaurant before but the vanilla ice cream at the side is so light and watery. I could taste the sweetness  only but without and flavour. It would be nice if the lava cake serve with a good dollop of vanilla ice cream.


I have been making different ice cream and this is the base of every ice cream. The important part is the ingredients and the best cooked custard. It produce a creamy, rich and smoorh  texture. This recipe is the best I have experienced so far and before I experiment a better one. I will stick on this recipe.  My family love it so much. Thumbs up!


Recipe modified from Cook with Jamie::


370ml whole milk


470mll cream


6 tablespoons caster sugar


2 vanilla pod, scored lengthways and seeds scraped out


6 large egg yolks


1 teaspoon vanilla bean paste


1 1/2 teaspoon cointreau


Miix the milk, 3 tablespoons of caster sugar and the vanilla pod and seeds together in a saucepan. Bring just to the boil, then remove from the heat and leave for a couple of minutes to cool slightly and allow the vanilla flavour to infuse. Discard the vanilla pod. 


In a large mixing bowl, whisk the egg yolks with the 3 remaining tablespoons of caster sugar until pale. Ladle a little of the hot milk mixture onto the eggs and whisk immediately. Continue to add the milk, a ladleful at a time, whisking each well before adding the next. Pour this mixture back into the warm saucepan and cook very gently for a few minutes, stirring constantly with a rubber spatula or wooden spoon until smooth and thicken. Strain the custard through a fine sieve and keep stirring to reduce the heat to avoid the egg cook any further. 


Once the custard slightly cool down, add the cream and vanilla bean paste and mix well. Lastly, add the cointreau if using. It is quite optional but I just like that little flavour inside the ice cream and  I also believe a bit of liqour helps the ice cream set smoothly in the freezer. Cling wrap the custard and chill in the fridge overnight before churning in the ice cream maker. Once the custard had churned,  transfer them to an ice cream container and keep in the freezer for few hours until set. Enjoy!


Lemon Gateau


I am falling in love with this lemon cake. It lightness and softness make me crave for more. The combination of soury lemon curd and a bit of fresh cream give a wonferful refreshing effect that you will not feel enough for it. I regret not to try it earlier. 


Recipe for the lemon curd: 


4 large eggs


120g caster sugar


130g lemon juice 


2-3 lemon zest


90g Butter


Combine the eggs, sugar, lemon juice and zest and cook over a double boiler until smooth and thicken.  Add butter and stir for the final shining and silky consistency. Set aside to cool while preparing for the sponge cake.


Recipe for an 8 inches sponge cake:


83g butter (salted)


83g cake flour


5 egg yolks (A size)


92g milk


5 egg whites (A size)


83g caster sugar


10g corn starch


Method


1. Prepare a cake pan, don’t need to line paper.


2. Immediate separate cold eggs from fridge (easy to separate this way) into two mixing bowls. Set aside to return to room temperature.


3. Melt butter in a saucepan, once you see small bubbles, remove from heat.


4. Immediately add in flour, quickly stir to become batter (at this stage, the batter is thick. Also suggest to transfer this batter to another clean mixing bowl), then add in milk, mix well.


5. Add in egg yolk one at a time, stir well on each addition. The batter is slightly runny if compare to normal chiffon batter.


6. Mix sugar and corn starch together. Beat egg whites till foamy, gradually add in sugar and corn starch mixture (in three batches) and continue beat until approaching stiff peaks (meringue stand straight up with a little curve at the tip) or till stiff peaks (this stage is a bit difficult to fold with egg yolk mixture)


7. Take 1/3 of meringue and use a hand whisk to mix well with egg yolk batter.


8. Fold in 1/3 of meringue and use a silicone spatula, gently fold with egg yolk batter till slightly combined. Fold in the balance meringue and gently fold till well combined.


9. Pour into cake tin, bake at pre-heated oven at 140C (no fan) for 25mins at low rack, then increase to 170C (no fan) for another 25mins.


10. Once baked, turn your chiffon tin upside down and cool completely before remove from the tin.


Assemble the cake:


Cut out three equal pieces of sponge cake horizontally. Whip up 300g of whipping cream with 1 tablespoon of icing sugar and 1 teaspoon vanilla. 


Place a piece of sponge cake on a plate or cake board. Spread some lemon curd on the cake follow by some whipped cream. Place another piece of sponge cake on the top and spread some lemon curd and whipping cream. Cover the last piece of sponge at the top then spread the whole cake with whipped cream. Freeze the cake until the cream harden then drizzle all the lemon curd on the cake evenly. 


Chill in the fridge. It is best serve cold from the fridge. Enjoy!