Profiteroles


This is one of my son favorites snack. The happiness of watching him enjoying every bites of the profiteroles is hard to describe. If he would eat the profiteroles like having his normal meal that would be good. 


I think not only my son, everyone including adult would love to eat this cute and delicate dessert, I would! 


Again, I dig out my very old recipe for the choux pastry as well as the pattieserie cream. I still find this recipe is the best for me. The pastry puff up nicely and stay soft even until the 3rd day from the fridge. The feeling of the first bite is so wonderful when the cold cream ozzing out from the pastry. Arhh... try it!


Recipe for 20 puffs:


For the Puff: 


70g plain flour


3 beaten eggs


100g water


60g unsalted butter


Pinch of sugar and salt


For the pattieserie cream: 


3 egg yolks


200ml milk


60g sugar


20g plain flour


10g unsalted butter


1 tsp vanilla extract


For the puff, boil the water, butter and pinch of sugar and salt in a cooking pan until its bubbling. Off the heat, immediately add in all the plain flour and mix with a wooden spoon until well combine and become a smooth dough.


Add half of the beaten eggs and mix (this stage is a bit hard work but please patient and keep stirring until the egg mix into the dough.) Once the eggs completely mix with the dough, you will find it quite dry and hardly to mix. Add the beaten eggs little by little into the dough and continue mixing. You might not finish using all  the beaten eggs. You will need to have a smooth and thick consistency of the mixture. When the spoon lift up the mixture, it should drop back to the pan slowly and form a transparent smooth skin from the spoon to the pan. The mixture should not too dry or too wet.


Once you get the right consistency of mixture, transfer it into a piping bag and pipe out about 20 dollops of mixture on a baking tray with baking paper.


Dip your fingers with some water and gently touch the tip of the mixture. This is to prevent it over burning on the top while it's baking in the oven. Then spray some water on the mixture surface. (Not too much)


Bake at middle rack of 200'C preheated oven for 15 minutes until it puff up then turn the temperature to 170'C and bake for another 15 minutes. (DO NOT OPEN THE OVEN DOOR DURING BAKING) 


Transfer the puff on a wire rack to cool down.


For the pattieserie cream, boil the milk with sugar until sugar dissolve but not boiling. Meanwhile, mix the egg yolks and flour to a thick paste but no lumps. Add two tablespoon of milk if you find it too dry to mix.


Pour the dissolve warm sugar milk into the egg yolks mixture, pour little by little and mix with a hand whisk until everything combine. Then, pour back the mixture into the cooking pan. Cook with very low heat and keep stirring until it thicken.


Once the mixture is thicken, remove from the heat and keep stirring until the heat slightly cool down but slightly warm. Then add in the butter and vanilla extract. Continue stirring until well combine.


Transfer the cream into a plate and cover with cling film. Make sure the cling film touch on the mixture, this is to prevent it from skin forming on its surface. Chill the cream in the fridge and ready to use.


Melt 100g of dark chocolate with 100g cream in a sauce pan. Stir and combine well.


To assemble the profiterole, poke a small hole with a knife or chopstick on top or side of each puffs. Fill the cream into a piping bag and squeeze into each puffs. Coated the top with melted chocolate and chill in the fridge for few hours before serve. Best serve cold within 2  to 3 days provided keeping well in an airtight container in the fridge.


爱玉冰 Honey Lemon Iced Jelly


This is one of my favourites refreshing dessert  which was first tasted 10 years ago in Taipei. I miss it crazily and couldn't forget the taste ever since I leave Taiwan.


Few years ago when I was doing groceries shopping in a supermarket and happened to saw this special jelly powder., without thinking too much I bought it to try.


At first I followed the packet instruction to make the jelly. It's tasteless but the jelly consistency is exactly the same that I had before. I make my own honey lemon juice go along with the jelly and finally it is exactly what I have been hunger for long long ago. After the first experiment, this dessert had become one of the dish for serving my guests always because it is so easy to made and could be made in advance. Most importantly it is very refreshing especially after a heavy meal.


I am submitting this post to Asian Food Fest #10 Aug 2014 : Taiwan hosted by travelling-foodies.


For the recipe you need a packet of this jelly powder. Boil 1 litre of water until bubbling. Turn of the heat and immediately add a packet of jelly powder into the hot boiling water. Stir until everything dissolve. Pour into a shallow dish wait until it cool.dowm then chill in the fridge to set.

For the honey lemon juice. Mix 500 ml water  with 2/3 cups of honey and 1 freshly squeeze lemon juice (I don't have the exact amount of quantity, so please mix and balance the sweetness to suit your taste). Mix everything until well combine and taste the sweetness or add more water if needed. Chill in the fridge.

Right before serving, cut the jelly into cube sizes and add into the honey lemon then add two cups of ice cube or more.  Enjoy!

Roasted Vegetables Quiche


Brought this quiche along to the beach for picnic and it's so yummy delicious. The colourful roasted vegetables is sweet and healthy that was purposely made for my dear son. I am so glad that he ate a big piece with good appetite.  The most wonderful feeling is your loves one enjoy the food you have prepared for them.


Ingredients for a pastry fit 28 cm tart pan


(This quiche is only 23cm, I use some leftover pastry for others recipe)


330g plain flour


35g sugar powder


1/2 teaspoon salt


70g whole beaten eggs


160g cold butter (cut into small chunk)


Ingredients for the fillings


Half a red pepper


Half a green pepper


Half a yellow pepper


A big red onion


half a green courgette


half a yellow courgette


a cup of chunky pumpkins


a cup of chunky aubergine


1 tablesppon olive oil


sea salt


60g whole eggs


10g egg yolks


50ml milk


50ml whipping cream


50g mascarpone cheese


Few pieces of cheese kraft


Half cups shredded cheddar cheese


For the pastry, mix the flour, sugar powder and salt in a food processor until combine.  Add the butter and pulse the food processor in few times until everything become fine bread crumbs.  Add in the beaten egg and pulse again for few times until it almost come to a dough. Take out the dough and flatten it to become a round disc. Cling wrap it and chill in the fridge at least 1 hour before use.


Line the chilled pastry onto a 23cm tart pan. Use a folk to poke some holes on the pastry then refrigerate for 30 minutes. Line a baking parchment on the tart surface and add the baking beans to blind bake the pastry at 220C preheated oven for 15 minutes. Take the pastry out and remove the beans and baking parchment. Egg wash the pastry surface and continue to bake for another 10 minutes. 


For the fillings,  put all the chopped chunky  vegetable into a roasting tray with a tablespoon of oil and sea salt.  Rub them so that everything well coated. I roast the vege in the Philips Airfryer at 190C for 10 minutes. I assume oven roast will be slightly longer. 


Place some cheese kraft onto the bottom of tart and add all the roasted vegetables. Mix the eggs, milk and cream together and pour over to the vegetables and tart. Lastly sprinkle over the shredded cheddar cheese on top of everything.  Bake at 220C preheated oven for 20 - 25 minutes.


Fun with fondue pot


I have just realised this little pot is actually  a really fun thing to play with especially for the weekend where everyone is relaxing at home or friends coming over for chit chat. It was such a waste I have been keeping few of them in my storeroom for  years until lately my son remind me he loves to blow candles. With this particular reason I have a reason for him to sit down and finish his meal with me and then he  is allowed to blow the fondue candle. It works! 


The first fondue I made is dessert fondue which serve along with my son's favorites fruits. Then the second is savoury cheese fondue serve with some vegetables. I personally like to dip the green apple with cheese, somehow I find the taste goes very well together. Nowadays,  playing with the fondue pot is something very special for my son, my hubby and me too! We are looking forward to have it every weekend, crazy us! Someone even request for curry fondue, isn't it crazy?


I discovered two quite nice and simple to made recipes for chocolate fondue and cheese fondue. Before I discover a better one, I will stick on this two recipes.


Chocolate Fondue:

I used half of the following ingredients for a small family like us.


3/4 cup heavy cream

8 ounces dark chocolate, finely chopped

1 tablespoon unsalted butter

3 to 4 tablespoons liqueur, such as chocolate (Godiva), hazelnut (Frangelico), almond (amaretto), orange (Grand Marnier), or coffee (Kahlúa)

Some favorites choices of fruits such as banana,  strawberry,  raspberry,  grapes, breadsticks etc.


Place the cream in a medium saucepan and bring to a simmer over medium heat. Reduce the heat to low, add the chocolate, and whisk until smooth.

Remove from the heat and whisk in the butter until smooth. Whisk in the liqueur until incorporated and smooth.

Transfer to a fondue pot and serve with desired dippers.


Cheddar cheese fondue:


The following ingredients for serving 4 to 6 person. I used half of the ingredients for a small family like us.


2 cups milk


1 tablespoon soy sauce


2 teaspoons ground dry mustard


1 clove garlic, peeled and crushed


3 tablespoons all-purpose flour


6 cups shredded Cheddar cheese

some favorite choices of vegetables, garlic bread, tortilla chips etc.


Place a medium saucepan over medium heat, mix together milk, soy sauce, crusted garlic and mustard. In another bowl coat the  cheddar cheese with flour. Then add into the warm mixture. Cook stirring frequently, until melted, about 10 minutes.


Season with salt and black pepper. Continue cooking until all ingredients are well blended, about 10 minutes.

Transfer mixture to a double boiler or fondue pot to keep warm while serving.


Happy Lunar New Year!

Hello there! I'll be away for some time but before that I'd like to use my very simple yet traditional new year cookies to wish all my supportive readers a very blessed Lunar New Year! Beside, I'm submitting this to ""j3ss kitch3n" who are hosting the Aspiring Bakers #3: My Favorite CNY Cookie (Jan 2011).
I know this peanut cookie might seems like nothing special to everyone but it's only what I can do for this coming Lunar New Year. I've tried out different version of peanut cookie recipes and this is the one that specially make for my mum as she particularly likes the bits of crunchiness yet the richness of peanut taste. As for me, I like all kind of peanut cookies as long as it had the finest peanut taste in it. I thought adding more grounded peanut for the cookies dough would increase the flavor but it doesn't work for my experiment last year. I found out the peanut should actually roasted to a slightly darker color in order to get a better taste. You might think the peanut may burnt but it's not actually. It helps to produce very  flavorful cookies yet the proportion used is only 400 gram of roasted peanut with 600 gram of plain flour instead of 1:1 proportion. Beside, I purposely ground the peanut quite coarsely to suit my mum taste bud, and she is happy with that! 
Lastly, I would like to bless everyone who are reading this have a wonderful yet healthy New Year! I will be here again to update my latest news after March 2011. BYE!!


Recipe:
400g peanut
600g plain flour
220g sugar powder
1 teaspoon salt
1 teaspoon baking powder
1 teaspoon baking soda
300ml peanut oil
  1. Roast the peanut in the oven at 180C for about 15 - 20 minutes until dark brown color. Please watch it as every oven are vary.

  2. When the roasted peanut still warm, try to skin off the peanut by using both hands to rub. Then use hair dryer to blow off the skin. 

  3. Ground the peanut coarsely to remain some bits of nuts for the crunchy texture. 

  4. In a mixing bowl, mix the grounded peanut, plain flour, sugar powder, salt, baking powder and baking soda until well combine.

  5. Gradually add in the peanut oil and mix until well combine. You will get quite crumbly texture but will still able to roll into a ball with your hands by giving it a bit of squeeze.

  6. I use 1 teaspoon measurement for each portions. Roll them up into balls then roast in a 175C preheated fan oven for about 13 minutes. Take them out and brush some egg yolks on top of each peanut cookies and continue to bake for another 10 - 12 minutes. 

  7. Let it completely cool on a wire rack before fill them into a cookies container. Enjoy! Happy Lunar New Year!

Ice Cream


If you've read my previous post about waffles, you would probably realized there are few ice cream recipes that I've not introduced to you which was my new discovering in ice cream making last month. So, here are three different ice cream I've made recently.


Chocolate Snickers Ice Cream
(This creamy dark chocolate ice cream, added with chocolate snickers give delicious texture and stay soft even after freezing)


Dulce De Leche Ice Cream

(Unique caramelized milk added with roasted almond is a decadent extravagance)


Cream Cheese Ice Cream

(Creamy and rich of cream cheese flavor is a heaven for cheesecake lovers)


There all turn out very nice for me. I was trying to figure out which one is the best to share with everyone but hardly rate which is the best. As for me, there all had very unique flavor and good taste! Check out the recipes if you like to give it a try. Cheers!


Chocolate Snickers Ice Cream

4 egg yolks

75g caster sugar
1 tsp cornflour
300ml milk
150g dark chocolate
300ml whipping cream
2 Snickers bars


Put the egg yolks, sugar and cornflour in a bowl and whisk until thick and foamy. Pour the milk into a heavy pan, bring just to the boil, then gradually pour the milk into a heavy pan, bring just to the boil, then gradually pour the milk on to the yolk mixture, whisking constantly.


Return the mixture to the pan and cook over a gentle heat, stirring constantly until the custard thickens and is smooth. Pour back into the bowl and stir in the chocolate until melted. Cover the custard closely, leave to cool, then chill for 6 hours or overnight.


Whip the cream until it has thicken, but is still soft enough to fall from a spoon. Fold it into the chilled custard and pour into  an ice cream maker to churn for 20-25 minutes until thick.


Fold in chopped chocolate snickers transfer to a freezer container. Freeze for 5 - 6 hours until firm.


Cream Cheese Ice Cream
175ml milk
120g caster sugar
125g philadelphia cream cheese
half teaspoon pure vanilla extract
1 egg
juice of half a lemon
350ml double cream


Heat the milk in a pan, and while it's getting warm, beat together the sugar, philadelphia, vanilla, and egg in a bowl. Still whisking, pour the bot milk into the cream cheese mixture and pour this back into the cleaned-out pan and make a custard in the regular way.


Pour into a bowl and let it cool, at which time add the lemon juice and then the double cream, lightly whipped.


Cover the custard closely, leave to cool, then chill for 6 hours or overnight.  pour into  an ice cream maker to churn for 20-25 minutes until thick. transfer to a freezer container. Freeze for 5 - 6 hours until firm.


Dulce De Leche Ice Cream
2 1/4 cups whole milk
1 1/4 cups dulce de leche
1/2 cup heavy cream
a splash of vanilla extract
a pinch of salt


In a heavy saucepan, heat the milk and dulce de leche just to a boil, stirring until the duce de leche is dissolved.Remove from the heat and add the heavy cream, vanilla extract, and salt.


Cool completely at room temperature. Store in an airtight container and refrigerate until thoroughly chilled, preferably overnight.


Churn the mixture in a ice cream maker for 20 - 25 minutes until thicken. Store in an airtight freezer container and freeze until harden.

Playing with my new toy!


I received a x'mas present from my hubby quite early this year, a Waffle Maker! That's what I've dreamed for some times ago and every time I pass by the Mayer shop, I would stand there looking at it for a few minutes. My hubby always got headache when thinking what to buy for my x'mas present but this year he settled it quite fast haha... We can't wait to try out the waffle maker, so I quickly flipped through a Belgian waffle recipe from 西点学习大百科.  This recipe highlight that original Belgian waffle normally made by yeast instead of baking powder and soda bicarbonate that I found is quite different. Since this is a Belgian waffle maker, I think this recipe would goes well with it.


I like this waffle maker because it had a deep pocket of baking plates which will make the waffle much thicker and crispy too! The result wasn't disappoint me as the waffles had a crispy texture at the outside and remain a fluffy crumbs. As this is my first attempt, I've no experience  on its heating temperature, the color of the waffles is slightly dark, so I think I would turn the heat down to slightly lower next round. I served it with my homemade chocolate snicker ice cream and cream cheese ice cream, brilliant! 


Recipe to make 4 pieces to fit in a Cuisinart Belgium waffle maker:


150g plain flour
3g instant dry yeast
1 tablespoon caster sugar
1/4 teaspoon salt
150ml fresh milk
50g sour cream
1 egg
30g unsalted butter (melted)
1 teaspoon vanilla extract
  1. Mix plain flour, yeast, sugar and salt together. Gradually add in milk, then sour cream, eggs follow by the melted butter and vanilla extract.

  2. Combine the mixture until a smooth batter then cover with cling film. Let the batter proof for 1 hour. 

  3. After an hour, the batter will appear some bubbles on the surface and the batter is almost double up. Use a spatula to mix with a folding method until the bubbles disappear. 

  4. Preheat the waffle maker then  pour in the batter until cook. (I followed the user menu instruction) 

  5. Serve it with honey, maple syrup or ice cream. Enjoy!

PS: The waffles will turn soft once it cool down. Toast it in a preheated 160C oven for 1 or 2 minutes to get back its crispiness. It can be kept in an airtight container  at room temperature for 24 hours or keep in the freezer for 2 weeks according to the recipe. But, fresh one always the best! Cheers!

Beef Stew


Since I don't have any special baking activities recently, I decided to post up my daily cooking here to keep you remember me :) I've stew quite often at home but never think of taking any pictures of it until my hubby mention to me. 

As I don't have a proper casserole which can be used on the hob to the oven, my stew was cooked in a normal pan then transfer to a slow cooker for further cooking process. I love to make stew simply because it's a one dish meal as it's easy to prepare and serve. Furthermore, it could be turned into different type of pie dish, either bake it with mashed potato, sliced potato, pastry or just have it straight with rice, pasta or mash that would not make me bore about it. I find the stew always taste better after the day it's cooked, so I normally cook more to keep in the fridge or freezer. Some people like to cook stew with stout but it's not for me and my hubby. So I use homemade chicken or beef broth to replace it, we love  it so much! Bon Appetit!


Recipe from Jamie Oliver. (I've slightly amended the recipe to suit our appetite)


Trim the ends off 1 big stick of celery and roughly chop • Peel and roughly chop 1 onions • Peel 1 carrots, slice lengthways and roughly chop • Put a casserole pan on a medium heat, fry 2 slices of chopped streaky bacon until slightly golden brown • Put all the vegetables, 1/4 teaspoon dried rosemary and thyme and the 2 dried bay leaves into the pan with 2 lugs of olive oil and fry for 10 minutes
 Add 300g beef  (cut into approximately 2cm cubes) and 1 tablespoon flour • Pour in 1 cup of chicken stock and 1 cup diced can tomatoes • Give it a good stir, then season with some sea salt and a few grinds of black pepper • Bring to the boil, put the lid on and either simmer slowly on your hob or cook in an 180C preheated oven for 3 hours • Remove the lid for the final half hour of simmering or cooking • When done, your meat should be tender and delicious • Remember to remove the bay leaves before serving, and taste it to see if it needs a bit more salt and pepper • You can eat your stew as it is with some mash potato and green peas at the side, or you can use it for pasta or even turn it into a beef pie. 

Homemade Pappardelle

I've been so slow for updating my blog recently and there is nothing else can help to cure my laziness. This pasta dish suppose to post on the last two weeks but I just couldn't help myself to move on uploading the pictures and click on the "new post". I still remember it's the time that Honey Bee Sweet also making homemade pasta and her spinach version is the real good one! My pasta machine had been on the sleep mode for about 3 years which I give the excuse of couldn't find any Tipo'00 flour in Singapore which I think is not true as I guess there must be somewhere selling it. It's just that I still haven't discover any places got this special flour for pasta. I insist to get this special flour otherwise I will not make it as I found it could produce a better texture. 


Last month, my friend bought me a pack of Tipo'00 flour from Europe and I really appreciate it and quickly took out my pasta machine to start on this Pappardelle. I've used to Jamie Oliver recipe so I try to recall to my previous attempt and hope it will success. The reason I choose to make Pappardelle because it's slightly expensive than normal dry pasta like angel hair, spaghetti, fettuccine. or linguine and the most important is, it's always my first choice in the pasta family just because I like the texture. But my pasta machine couldn't roll out to the width of Pappardelle. So what I can do is just fold it up and cut it with a knife. I'm quite happy with the result although it's slightly rustic but I really miss the real taste of fresh homemade pasta. 


I didn't make any fancy sauce to go with it but cook with the most simple and basic Italian cooking style like fresh cherry tomatoes, garlic, basil, freshly grated Parmesan cheese and drizzle with some extra virgin olive oil right before serving. I like it very much and so much satisfaction on this fresh Pappardelle. It's real fun playing with the pasta machine again!


Sorry that I'm too lazy to post up the recipe but it can be easily get from Jamie Oliver's website as I followed exactly the same recipe of the fresh pasta and the classic tomato pasta. Cheers!

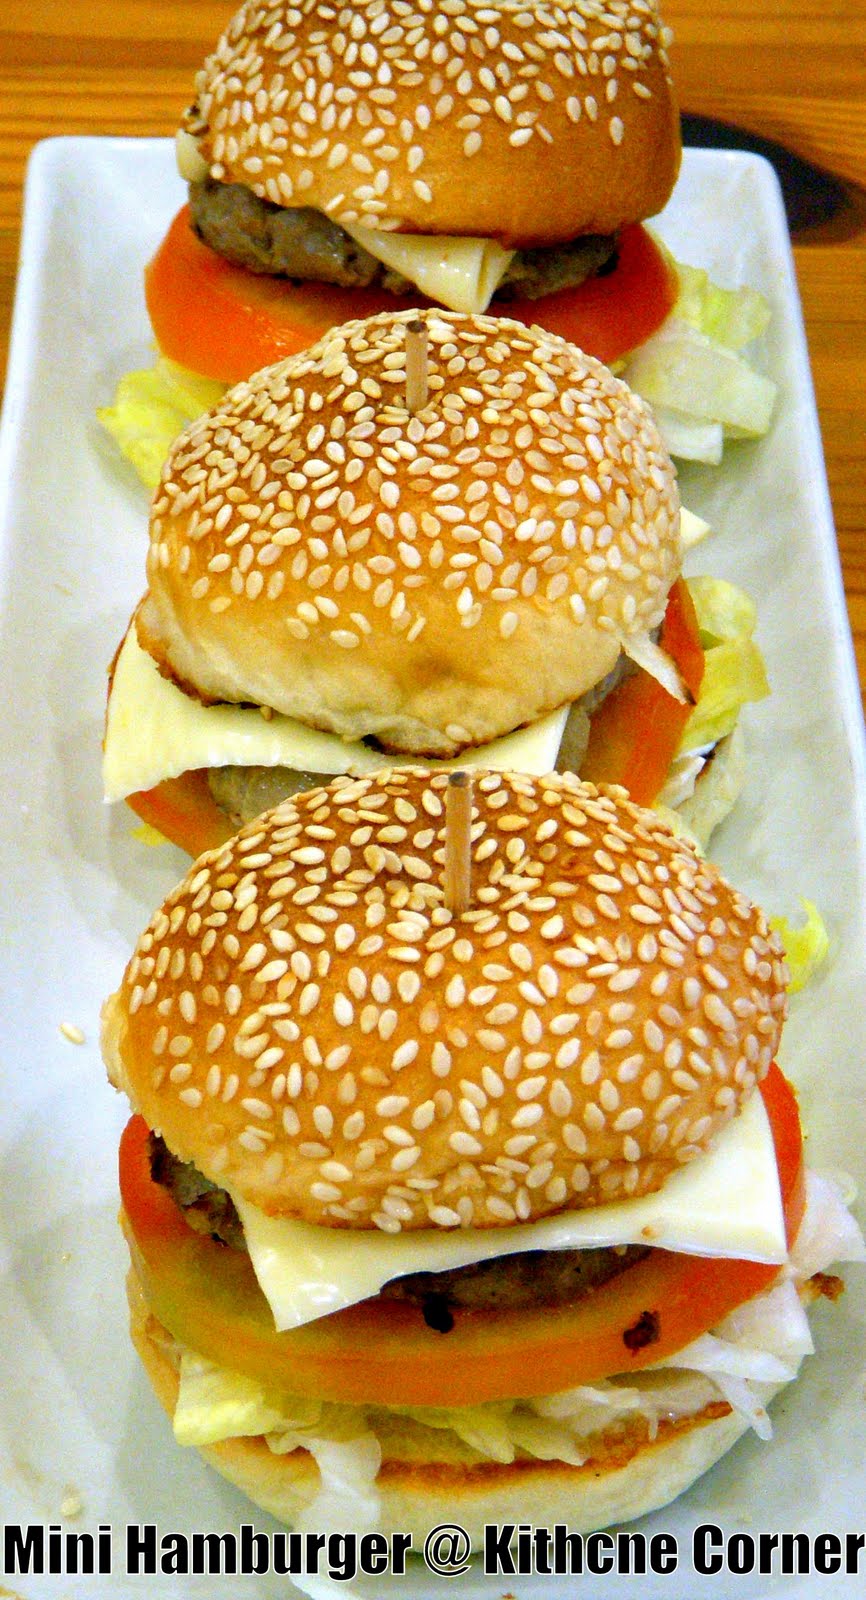
Homemade Hamburger

I make this burger quite often so I thought it would be much easier for me to prepare some for a bloggers meet up last week. The bun and meat actually made ahead of time that sitting in the freezer until I need it. I'm so sorry to Edith as I didn't make extra for her family members. So I post up this recipe here for your reference and for any bloggers that you had tried and like it. Please feel free to make it and remember to make a big batch to freeze it so that you could have homemade hamburger in no time whenever you crave for it. Cheers!

Recipe for the patties:

  • 250g minced pork
  • 250g minced beef
  • 1 big onion, peeled and finely chopped
  • Olive oil
  • 1/4 teaspoon of cumin powder
  • 1/4 teaspoon fennel powder
  • 1/2 teaspoon coriander powder
  • some sea salt and ground black pepper
  • a handful of freshly grated parmesan cheese
  • a tablespoon Djon mustard
  • 1/2 beaten egg
  • 80g fresh wholemeal breadcrumbs

  1. Fry the onion with some olive oil in a pan for few minutes until softened. When the onion completely cool down, mix it to the meat.
  2. Add the rest of the ingredients and half of the breadcrumbs and mix well. (if the mixture is too sticky, add a few more breadcrumbs)
  3. Shape the meat into the size you like and place on a tray with greaseproof paper.
  4. Sprinkle some bread crumbs on top of each burger and press down gently. Chilled in the fridge for 3-4 hours or in the freezer if not using it immediately.
  5. Fry the burger in a little oil on medium high heat for few minutes, depending on the thickness of the meat.
To assemble the burger, spread some salted butter on the buns and grill it on a griller or pan fry for a few minutes until it slightly turn crisp.
Spread some djon mustard or mayonnaise on the bottom part of the buns and then top with some lettuce. Layer with the meat then follow by cheese kraft and freshly sliced tomato and finally the top part of the buns. Enjoy!


For big burgers, make it into 8 buns and 8 slices of meat or like the party mini burger 20 buns and 20 slices of patties. Some


above pictures shown are big burger in 4 inches diameter size whereas some pictures shown are small in 2 1/2 inches diameter size just like the mini burger sit on my hand. I normally make the buns first then the patties. So that the patties had got the same size with the bun and can be fixed nicely between the buns too as I hardly estimate what size of the dough will expand after proofing.


Recipe for 8 buns (approximately 60g for each dough or make more into small little buns):


210g bread flour / 56g plain flour / 20g milk powder / 42g


caster sugar / half teaspoon of salt / 6g yeast / 30g beaten eggs / 85g water / 84g water dough / 22g unsalted butter


Recipe for the water dough "water roux":

Cook 125g water with 25g bread flour at medium low heat, keep stirring until it become thicken and no lumps left. If you've a candy thermometer, measure it until the temperature turn to 65C then turn of the heat. I didn't measure it with thermometer, so I cook it until quite liquid consistency like the baby porridge. Transfer to a clean bowl to cool down.


Methods:

  • Place all the ingredients for kneading except the butter until everything come together and become a smooth dough then add in the butter a little at a time.
  • Let the dough slowly absorb the butter then turn to speed two if you are using kitchenaid mixer. Knead until the dough no more sticking at the side of the mixing bowl and the dough should be very smooth and elastic.
  • Let it proof for 40 minutes in a clean bowl cover with cling warp.
  • Divide the dough into even size of 8 portions or any size you like it to be then let it rest for 10 minutes.
  • Shape the dough into smooth round shape. Prepare some water on a a clean plate and place a kitchen towel on the top. Damp the surface of each dough and run the damp surface around a bowl of sesame seeds. Place the dough on a baking tray and let the it proof for 40 minutes. Bake at 180C for 15 minutes.